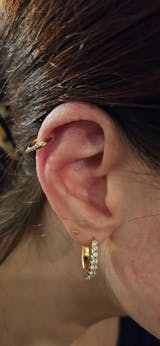
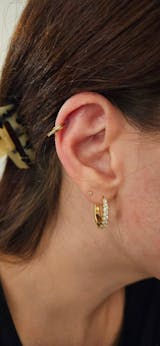
Piercing esthétiquement beau, de qualité et qui, pour le moment, ne s'ouvre pas tout seul. J'ai pu faire une séance de bungee avec, de la danse contemporaine et il n'a pas bougé.
J'ai pris le diamètre 8mm pour l'hélix. Je pense que pour le rendu que j'avais en tête, un 6 mm aurait été mieux.
Il n'en reste pas moins un bijou de qualité, fin et élégant. Je valide et je recommande !
Mes photos ne rendent pas honneur à la beauté réelle du bijou, mais ça donnera une idée du rendu à celles et ceux qui hésitent.
Merci beaucoup pour ce retour plein de details Anais :)
On est vraiment ravis que ce bijou te plaise.
Chloé & JP
piercing magnifique très bonne qualité
Merci beaucoup pour cet avis et ton retour.
Chloé & JP
Très beau bijou, simple et de la bonne taille. On a pas l'impression qu'il est trop petit ou justement trop voyant surtout pour un bijou à l'helix. La qualité est top
Merci énormément pour ton avis Inès,
Ravis que ton nouveau bijou te plaise autant que le précédent !
Chloé & JP
Super bijoux, très joli discret, beaucoup d’éclats. Aucune gêne au niveau de mon oreille, matériaux très adapté. Chloé est toujours aussi professionnel et toujours de bons conseils ,à l’écoute. Merci beaucoup je recommande +++
Merci beaucoup pour ton commentaire, et heureux que ton bijou te plaise :)
Merci également pour tout ces compliments qui font chaud au coeur.
Chloé & JP
J'ai commandé car je devais changer de bijou chez mon perceur, j'ai reçu ma commande très rapidement. Le bijou est conforme à la description et aux images. Il est trop beau ! Ca fais seulement un jour que je le porte mais pour le moment pas de réaction ou quoi que ce soit tout est nickel
Je trouve juste que c'est un peu cher pour un piercing
Bonjour Inès,
Merci pour ton retour, on est ravis de savoir que tu trouve ton bijou trop beau et qu'il ne te provoque aucune réaction chez toi.
Concernant le prix, il est largement justifié par tous ces beaux compliments que tu viens de faire et par le fait qu'il s'agisse d'un titane de grade médical (ASTM F136) qui, justement ne provoque aucune réaction allergique.
Passe une excellente journée 🙂
Chloé & JP


